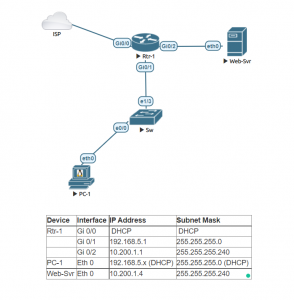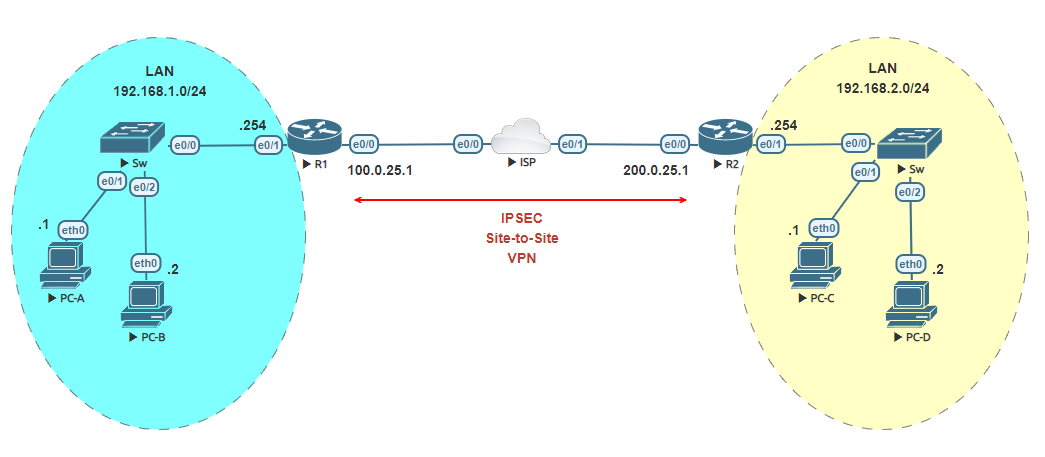
Simple IPSEC VPN lab. In this lab you will connect two sites through the internet with an IPSEC VPN tunnel. Each site has its own static public IP address assigned by the ISP.
IPSEC has five steps in the operation of IPSEC. Before getting to the first steps lets implement the basic configurations in order to setup the lab.
Configure the hostname and IP addresses of the ISP router.
Router>enable
Router#configure terminal
Enter configuration commands, one per line.  End with CNTL/Z.
Router(config)#hostname ISP
ISP(config)#no ip domain-lookup
ISP(config)#interface ethernet 0/0
ISP(config-if)#ip address 100.0.25.2 255.255.255.252
ISP(config-if)#no shutdown
ISP(config-if)#exit
ISP(config)#interface ethernet 0/1
ISP(config-if)#ip address 200.0.25.2 255.255.255.252
ISP(config-if)#no shutdown
ISP(config)#interface loopback 0
ISP(config-if)#ip address 1.1.1.1 255.255.255.255
ISP(config-if)#no shutdown
Configure the hostname and IP addresses of router R1.
Router>enable
Router#configure terminal
Enter configuration commands, one per line.  End with CNTL/Z.
Router(config)#hostname R1
R1(config)#no ip domain-lookup
R1(config)#interface ethernet 0/0
R1(config-if)#ip address 100.0.25.1 255.255.255.252
R1(config-if)#no shutdown
R1(config-if)#exit
R1(config)#interface ethernet 0/1
R1(config-if)#ip address 192.168.1.254 255.255.255.0
R1(config-if)#no shutdown
R1(config-if)#exit
Configure the hostname and IP address of router R2.
Router>enable
Router#configure terminal
Enter configuration commands, one per line.  End with CNTL/Z.
Router(config)#hostname R2
R2(config)#no ip domain-lookup
R2(config)#interface ethernet 0/0
R2(config-if)#ip address 200.0.25.1 255.255.255.252
R2(config-if)#no shutdown
R2(config-if)#exit
R2(config)#interface ethernet 0/1
R2(config-if)#ip address 192.168.2.254 255.255.255.0
R2(config-if)#no shutdown
R2(config-if)#exit
R2(config)#
Configure the VPCs hostnames and IP addresses.
VPCS> set pcname PC-A
PC-A> ip 192.168.1.1 /24 192.168.1.254
Checking for duplicate address...
PC1 : 192.168.1.1 255.255.255.0 gateway 192.168.1.254

VPCS> set pcname PC-B
PC-B> ip 192.168.1.2 /24 192.168.1.254
Checking for duplicate address...
PC1 : 192.168.1.2 255.255.255.0 gateway 192.168.1.254

VPCS> set pcname PC-C
PC-C> ip 192.168.2.1 /24 192.168.2.254
Checking for duplicate address...
PC1 : 192.168.2.1 255.255.255.0 gateway 192.168.2.254

VPCS> set pcname PC-D
PC-D> ip 192.168.2.2 /24 192.168.2.254
Checking for duplicate address...
PC1 : 192.168.2.2 255.255.255.0 gateway 192.168.2.254
Now, the last thing before the 5 steps in configuring the IPSEC Site-to-Site VPN. Configure on router R1 and R2 a default route to the ISPs IP address of its external static public IP address.
R1(config)#ip route 0.0.0.0 0.0.0.0 100.0.25.2

R2(config)#ip route 0.0.0.0 0.0.0.0 200.0.25.2
Step 1:
Configure the traffic that we wish to encrypt. This is also known as Interesting traffic. This needs to be configured on both routers R1 and R2. The crypto ACL will need to identify only outbound traffic on each router. The permit statement in the ACL will specify the traffic flow that will be encrypted when exiting. Only traffic from R1 internal LAN network to R2 internal LAN will be encrypted, any traffic intended to any other network will not be encrypted.
Step 2:
We need to add an exemption for NAT traffic on the routers for Internet access. IPSEC does not work with NAT, so that is why we need to exclude the traffic in the Crypto ACL in order for it to not be translated. First exclude the traffic and then add the NAT functionality to each router.
Step 3:
Configure Phase 1 (ISAKMP). Phase 1 of the IPSEC operation is used to establish a secure communication channel for further data transmission. VPN peers exchange a shared secret key, to authenticate each other, and negotiate IKE security policies. The ISAKMP policy will indicate to its peer what security parameters must be used in the VPN.
Step 4:
Configure Phase 2 of the IPSEC. After a secured tunnel is established in phase 1, setting up the VPN is to negotiate the IPSEC security parameters that will be used to protect the data and messages within the tunnel. In this phase the following functions are performed:
- Negotiation of IPSEC security parameters and IPSEC transform sets.
- Establishment of IPSEC SAs.
- Renegotiation of IPSEC SAs periodically to ensure security.
After configuration of a transform set on both routers peers, we need to configure the crypto map which will combine all Phase 2 IPSEC parameters. This crypto map is then attached to the VPN termination interface.
Step 5:
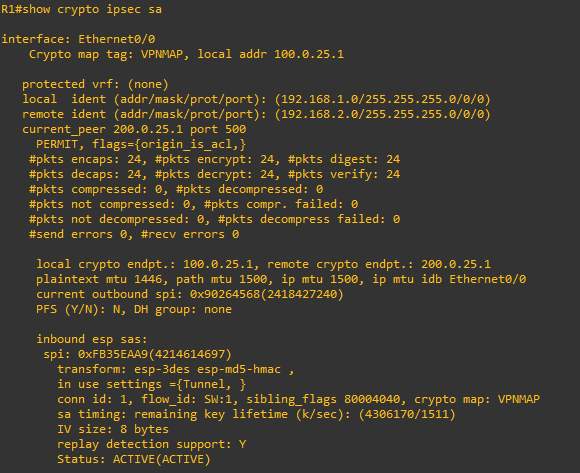
Verification of encrypted data transfer. The command “show crypto isakamp sa” can be used to verify if a tunnel has been established.

**If by any chance the tunnel doesn’t seem to have form you can ping one of the host devices that belong to the peer sourcing your internal network ip in this case router R1 – 192.168.1.254. Sometimes if forces the tunnel to form when you specify using

To verify the data is being encrypted and decrypted successfully use the “show crypto ipsec sa” command.
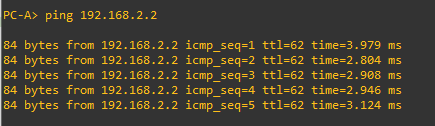
Make sure you can successfully ping from one host in the internal network to the another host on the peer’s internal network.
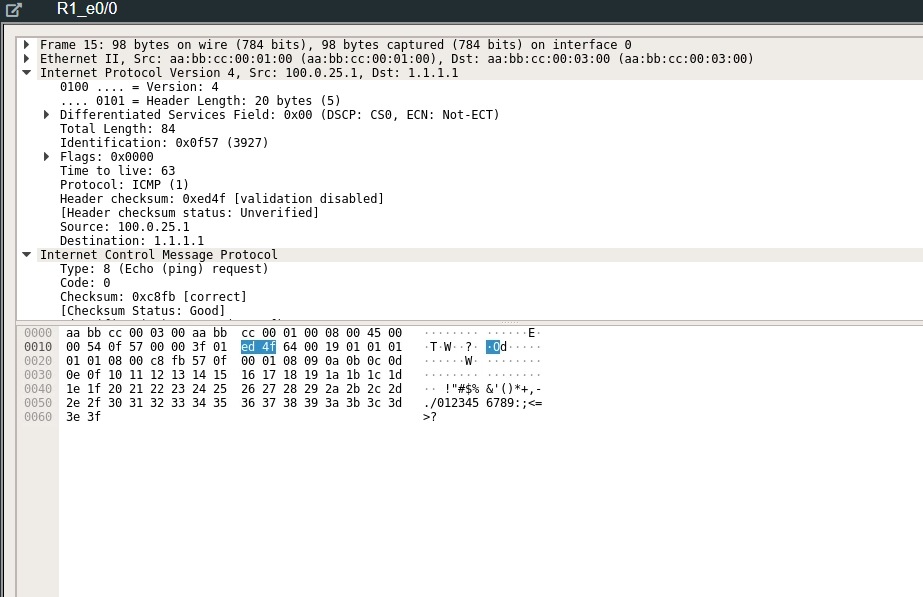
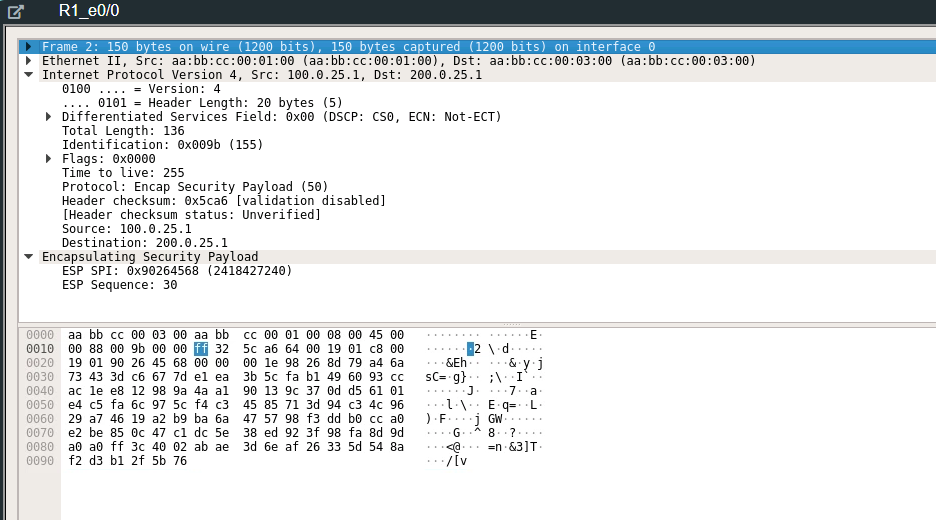
Doing a packet capture on wireshark and pinging from host to the peer’s host and then pinging the ISP loopback 0 to simulate traffic out to the worldwide web you can see how when communication flows through the IPSEC tunnel versus communication to a outside IP address on the web.
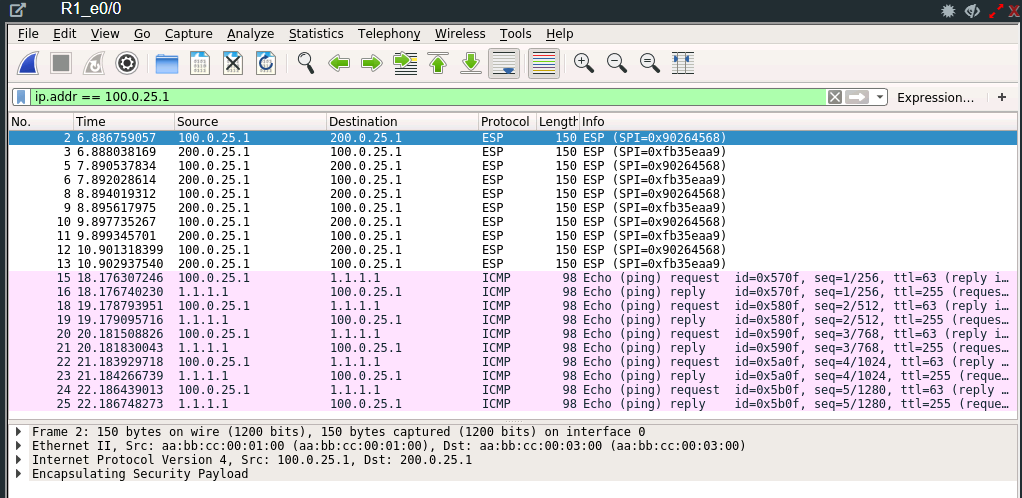
A packet captured from the ping from a host inside to one of the peers host will show you an encrypted packet using ESP (Encapsulating Security Payload) protocol.
In comparison, pinging normally to the loopback address where communication is not protected by the IPSEC tunnel thus in clear text.