OSPF (Open Shortest Path First) is a type of link-state routing protocol used in computer networks. It allows routers to dynamically exchange information about the network topology, including the state and cost of each link. This information is used to calculate the shortest path to a destination network, making OSPF a reliable and efficient way to route traffic within a network. OSPF is commonly used in large enterprise networks and is known for its scalability, fast convergence times, and support for variable-length subnet masks.
OSPF is an interior gateway routing protocol (IGRP). That means that it’s a routing protocol used within an autonomous system (AS). OSPF uses Link State Advertisement (LSA) packets between routers running OSPF. LSAs are packets of information that routers exchange with one another in order to build and maintain a map of the network topology. Each router in an OSPF network generates its own set of LSAs, which describe the state and cost of each link to neighboring routers. These LSAs are flooded throughout the network, allowing all routers to build a complete picture of the network topology. By exchanging LSAs, OSPF routers are able to quickly and efficiently calculate the shortest path to a destination network, making OSPF a reliable and efficient routing protocol for large enterprise networks.
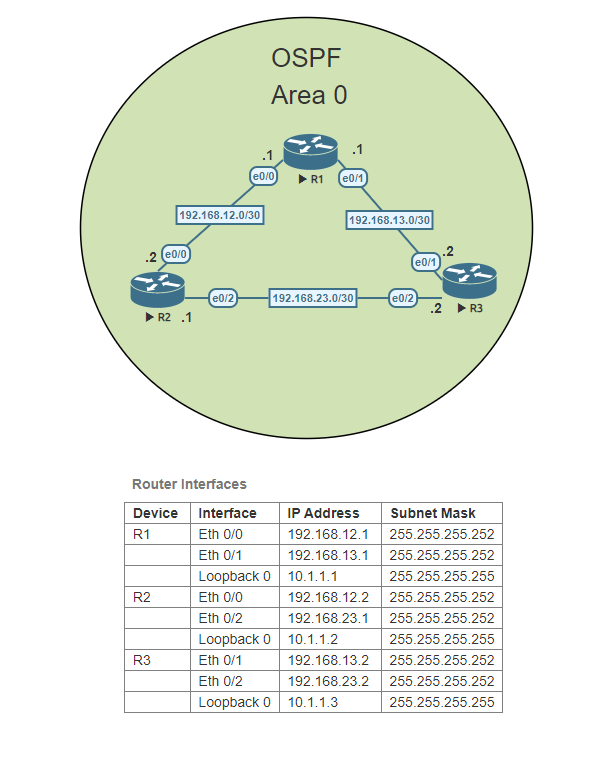
In this Lab, we will be configuring a basic OSPF topology using three routers in the same OSPF Area, Area 0. In OSPF, Area 0 is known as the backbone area of the network. It is the most important and central area in an OSPF network and is the only area that all other areas must connect to directly. The importance of Area 0 lies in its function as a transit area for routing information between different areas in the network. For this lab, we will concentrate only on OSPF Area 0. No other areas are needed.
Configure the hostnames on each Router
Access each router and configure the router hostname to match the topology above.
Configure R1’s interfaces
Access R1 and configure each interface. Set a loopback address on loopback 0 to 10.1.1.1. Don’t forget to activate the interfaces.
Configure R2’s interfaces
Access R2 and configure each interface. Set a loopback address on loopback 0 to 10.1.1.2. Don’t forget to activate the interfaces.
Configure R3’s interfaces
Access R3 and configure each interface. Set a loopback address on loopback 0 to 10.1.1.3. Don’t forget to activate the interfaces.
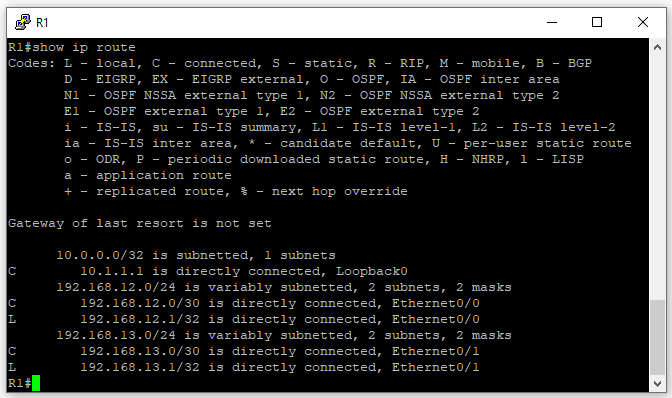
R1’s Routing Table
Before we configure OSPF on the routers, let’s run a show ip route to take a look at the routing table of R1. You will notice that although we have a small topology at this moment R1 isn’t aware of the network that connects R2 and R3 192.168.23.0/30.
Configure OSPF on R1
Access R1 and configure OSPF with a process ID of 1. Add each network using the appropriate wild card mask. Remember that these networks should be using Area 0 as the OSPF area ID.
Configure OSPF on R2
Access R2 and configure OSPF with a process ID of 1. Add each network using the appropriate wild card mask. Remember that these networks should be using Area 0 as the OSPF area ID.
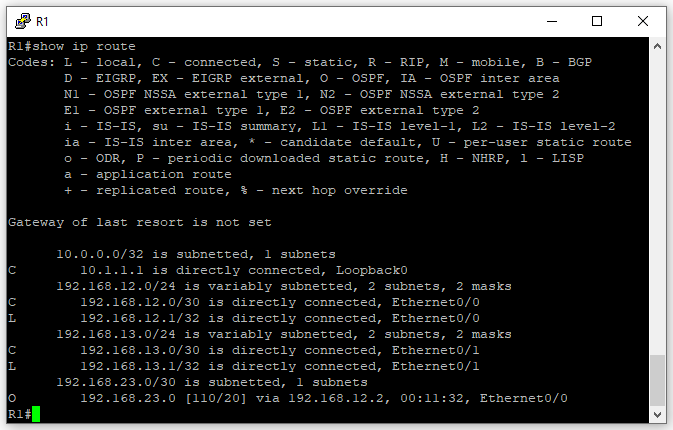
R1’s Routing table after OSPF
Now that we have configured OSPF on R1 and R2, both routers should now be OSPF neighbors. Run show ip route on R1 again to see if you now see the network between R2 and R3.
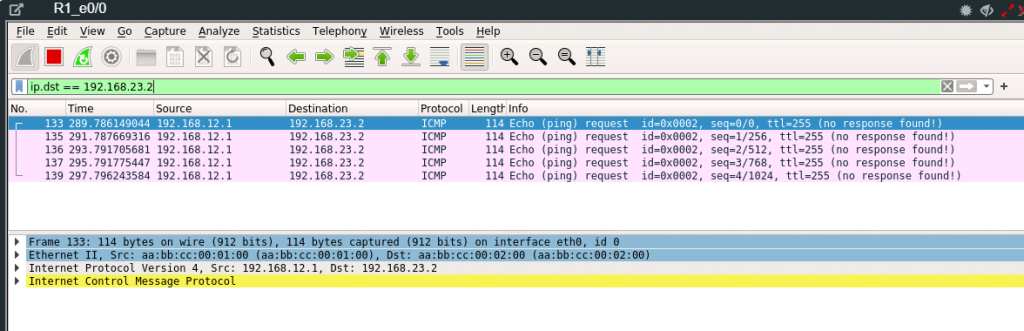
Now let’s test network connectivity, from R1 ping both IPs of the 192.168.23.0/30 network. You will notice the interface that belongs to R2 (192.168.23.1) responds back to R1. But the interface that belongs to R3 does not.
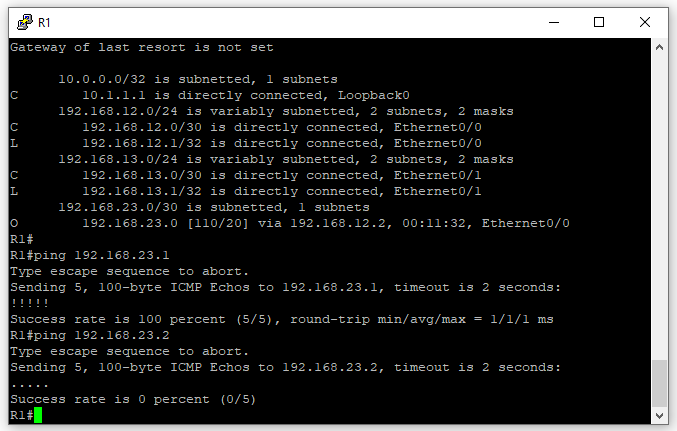
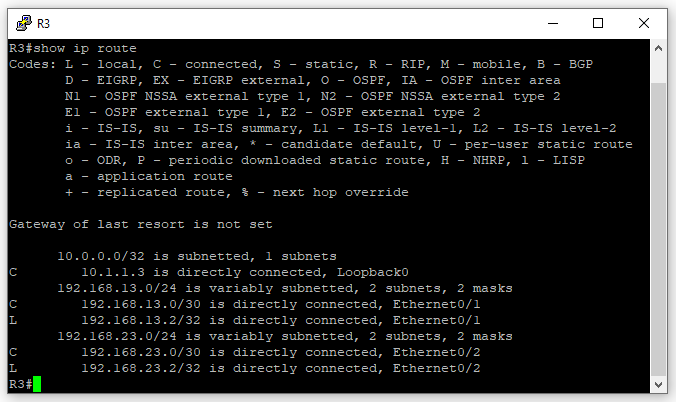
If you view R3’s routing table you will see that R3 is not aware of the network that connects R1 and R2. Therefore although the ping packets arrive to R3, since it has no way of knowing where to send the packets the ping packets are discarded.
Using Wireshark on R1’s Eth 0/0 interface we can see the ICMP ping packets sent from R1’s 192.168.12.1 IP address. Because if you look at R1’s routing table it indicates the 192.168.23.0/30 network is learned via OSPF and its way out is using the Ethernet 0/0 interface.
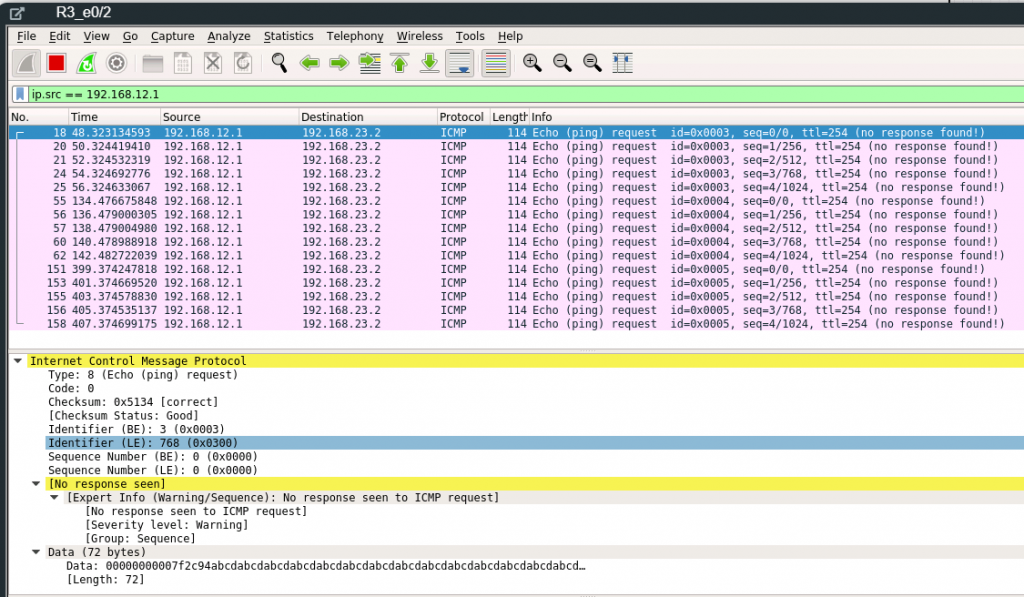
If we use Wireshark to view the traffic on R3 Eth 0/2 interface we can see the traffic arriving at R3 but no response is seen to the ICMP request because as mentioned earlier the traffic is discarded by R3 because there is no route to 192.168.12.0 on R3.
Configure OSPF on R3
Access R3 and configure OSPF with a process ID of 1. Add each network using the appropriate wild card mask. Remember that these networks should be using Area 0 as the OSPF area ID.
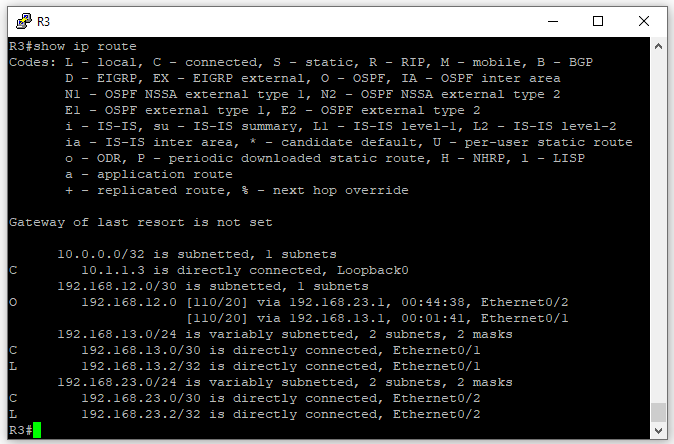
After configuring OSPF on R3, using show ip route we can see that now R3 has the 192.168.12.0/30 network in its routing table.
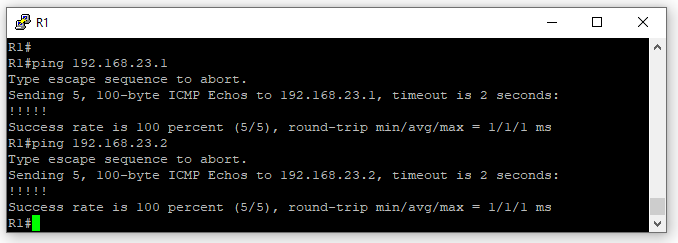
Pinging from R1 to both 192.168.23.1 & 192.168.23.2 is now successful.
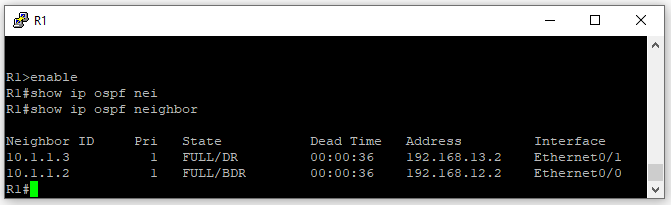
Running the show ip ospf neighbor command on R1 we can see that R1 has both R2 & R3 as OSPF neighbors. Which means R1 has established neighbor adjacencies with R2 & R3.
Using Wireshark on R1 interface port Eth 0/0, we can see the OSPF traffic. OSPF communicates via multicast address 224.0.0.5. For the most part, we see Hello Packets. These packets are originating from both R1’s internal interface IP address 192.168.12.1 and as well from R2 IP 192.168.12.2. We see as well a Link-State Update message and a Link-State Acknowledge message.

OSPF Message Types
OSPF uses five types of routing protocol packets, which share a common protocol header. Every OSPF packet is directly encapsulated in the IP header. The IP protocol number for OSPF is 89.
- Type 1: Hello packet: Hello packets are used to discover, build, and maintain OSPF neighbor adjacencies. To establish adjacency, OSPF peers at both sides of the link must agree on some parameters contained in the Hello packet to become OSPF neighbors.
- Type 2: Database Description (DBD) packet: When the OSPF neighbor adjacency is already established, a DBD packet is used to describe LSDB so that routers can compare whether databases are in sync.
- Type 3: Link-State Request (LSR) packet: When the database synchronization process is over, the router might still have a list of LSAs that are missing in its database. The router will send an LSR packet to inform OSPF neighbors to send the most recent version of the missing LSAs.
- Type 4: Link-State Update (LSU) packet: There are several types of LSUs, known as LSAs. LSU packets are used for the flooding of LSAs and sending LSA responses to LSR packets. It is sent only to the directly connected neighbors who have previously requested LSAs in the form of LSR packet. In case of flooding, neighbor routers are responsible for re-encapsulation of received LSA information in new LSU packets.
- Type 5: Link-State Acknowledgment (LSAck) packet: LSAcks are used to make flooding of LSAs reliable. Each LSA received must be explicitly acknowledged. Multiple LSAs can be acknowledged in a single LSAck packet.
Observe the OSPF Adjacency Process
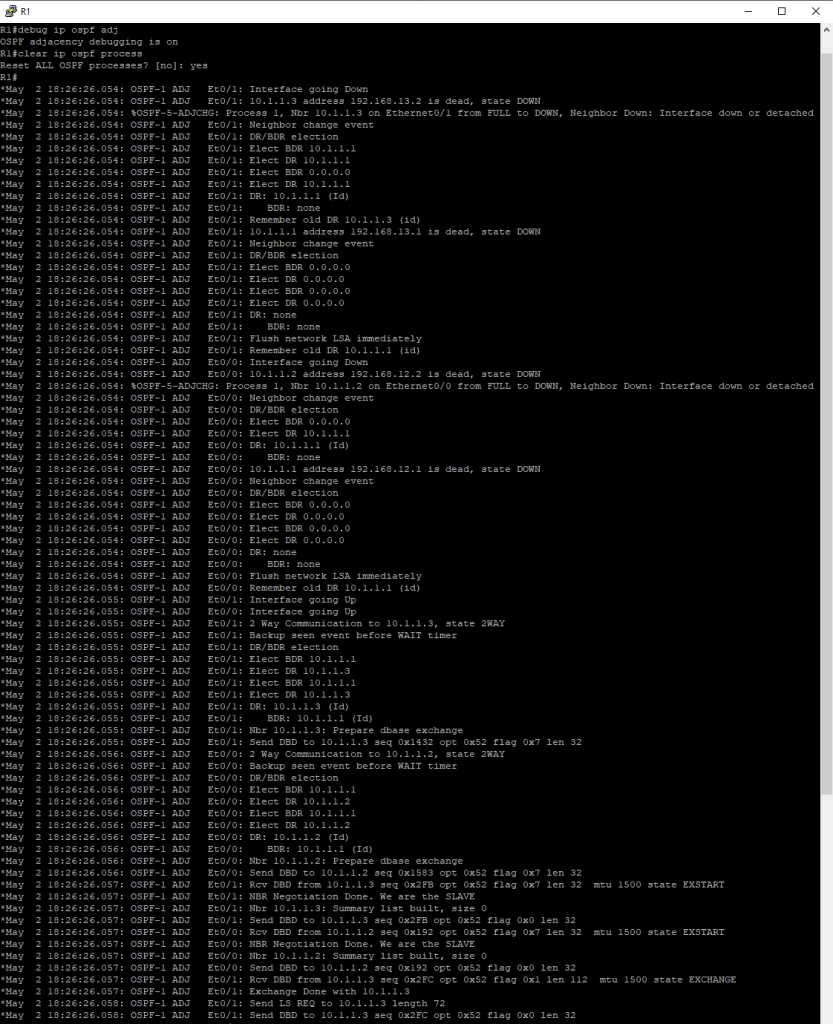
We can view the OSPF adjacency process by entering the following commands. First, enter debug ip ospf adj in the R1 terminal. Then, clear the ospf process by entering clear ip ospf process in the terminal. Observe how R1 interfaces go down. Also observe that once an OSPF Hello packet is received from its neighbor as it goes through the different states from Down to Init, then Init to 2-way. Once in 2-way the Designated Router (DR) and Backup Designated Router (BDR) election occurs. After the DR and BDR are selected the OSPF state will move to Exstart and followed by Exchange. During the Extstart and Exchange state, the routers will exchange Database Descriptor (DBD) packets. After the Exchange state, the routers will move to a Loading State where the routers will send Link-State requests followed by Link-State Acknowledge and this will continue until all Link-State update packets are acknowledged. Once complete and databases are fully synchronized the routers will move to a Full state.
We can see the exchanges on Wireshark as well. Hello Packets, Link-State Updates, Database Description (DBD), Link-State Request, and Link-State Acknowledge are all visible in the Wireshark capture.
