Connecting via SSH is essential in today’s networks. Cisco devices are not automatically capable to use SSH. It has to be enabled and configured. SSH (Secure Shell) is a secure method to remote access network devices as it includes both authentication and encryption. To configure SSH you will need an IOS image that supports crypto features.
This lab is a basic SSH configuration. I will be using a Ubuntu 18.04 image as a workstation to connect to the router.
When configuring SSH on a Cisco router you will need to make sure the router has a host name. It will also need a domain name. An RSA key will need to be generated, user will need to be created on the Cisco router and finally after SSH is enabled you will need to configure the VTY lines to allow the connection to occur.
Task 1:
Configure the host name on the router.
Task 2:
Configure a domain name.
Task 3:
Generate a RSA key. I recommend 2048 or greater when configuring the modulus bits. Make sure you use SSH version 2.
Task 4:
Create a user with a password and an enable password. Make sure you use your own password and that you follow your companies security policies when creating a user account.
Task 5:
Now that SSH is enabled we need to configure the VTY lines to allow the SSH connection through.
Task 6:
Configure the ip address of the LAN connection of the router.
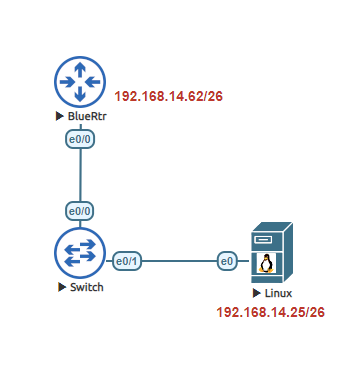
Once the configuration is complete, now we need to test. I am using an Ubuntu 18.04 image. In this lab the most important part is to configure the device to be on the same network. In reality, SSH will work when connecting from an outside network so long as the device has a route to the network device and that it is not blocked from an ACL or Firewall.
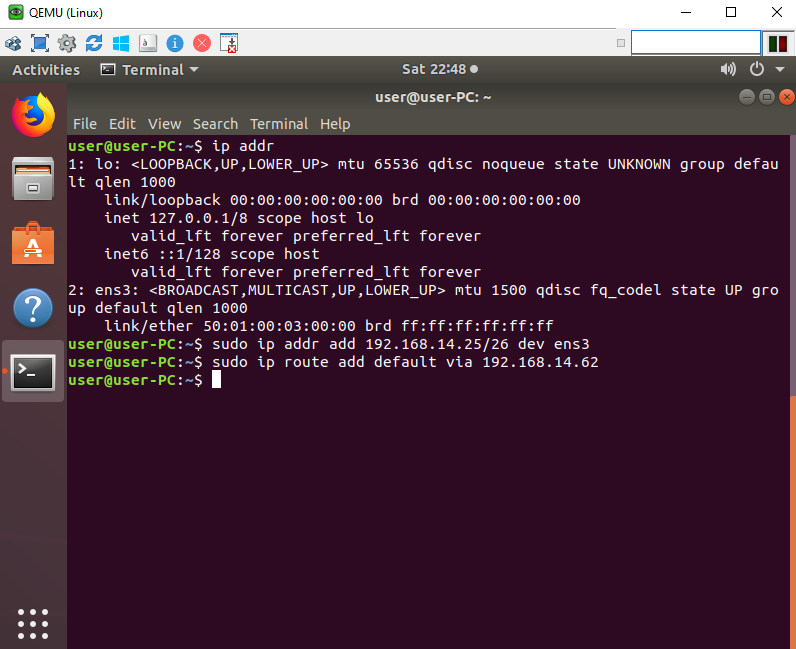
To configure a static IP address in Ubuntu 18.04, we will need to identify the physical named interface on the device. To find out the proper name type “ip addr“. Once identified in my case its ens3, Enter the following command to statically configure the IP address “sudo ip addr add 192.168.14.25/26 dev ens3“. To configure the gateway enter the following command “sudo ip route add default via 192.168.14.62“.
Ping the gateway to confirm the device can ping the router.

Finally let’s test the SSH connection by typing “ssh admin@192.168.14.62“. Type in the user’s password when requested, and the enable password as well. Congratulations you have configured and connected to a router via SSH.