Different than Static NAT, PAT (Port Address Translation) allows internal IPs to be translated into one IP via Port numbers. This allows a network to support many hosts while conserving public IP addresses. The router keeps a NAT table entry for every unique combination of the private IP addresses and port, with translation to the global address and a unique port number.
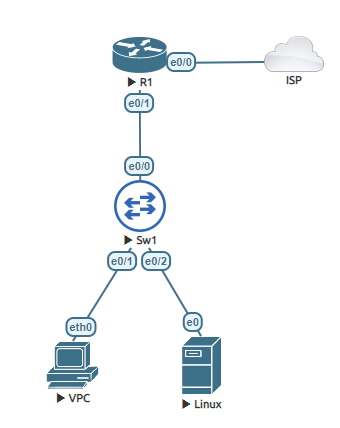
This lab is divided into two parts. First connecting a Cisco router to the NAT network which allows a connection to the outside (Internet). Second is using NAT overload also known as PAT to connect multiple devices from your LAN to an outside IP.
Part 1:
This is related to EVE-NG. To test the connection of the router with multiple hosts. We want to first create a connection to the internet. This will allow a more realistic lab as this is how Cisco router will usually connect to an internet connection.
1-A: Once you are in the lab screen, Right click to add a new object and select network.
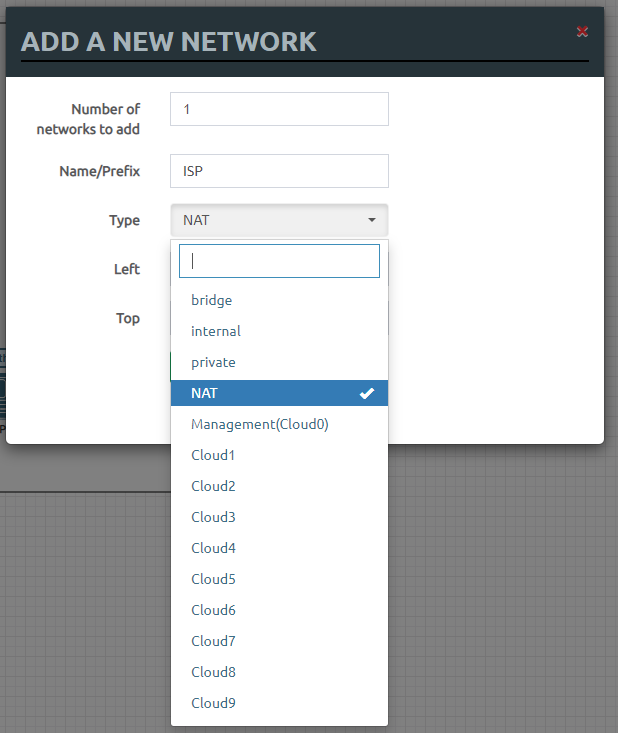
1-B: In the Drop down menu, select the NAT option and then click on the save button.
1-C: Add a new object (Node), a Cisco router. Link the router to the network connection that was previously created.
1-D: Once the router powers up enter the global configuration mode. Change the host name of the router. Then enter interface configuration mode to the corresponding port that is connected to the Network object created. Once in the interface configuration mode assign the ip address to dhcp.
Router>enable
Router# configure terminal
Router(config)#hostname R1
R1(config)#interface ethernet 0/0
R1(config-if)#ip address dhcp
1-E: After an IP address has been assigned from the DHCP server. Proceed to exit the configuration mode and ping 8.8.8.8, which is Google’s DNS server address. If the ping is successful, proceed to global configuration mode again and a DNS server IP. You can use your networks own DNS or add 8.8.8.8 by typing ‘ip name-server 8.8.8.8’. Exit the global configuration mode and ping using a URL (Uniform Resource Locator). If successful you are ready to proceed to the lab.
R1#ping 8.8.8.8
Type escape sequence to abort.
Sending 5, 100-byte ICMP Echos to 8.8.8.8, timeout is 2 seconds:
!!!!!
Success rate is 100 percent (5/5), round-trip min/avg/max = 11/13/18 ms
R1#configure terminal
Enter configuration commands, one per line.  End with CNTL/Z.
R1(config)#ip name
R1(config)#ip name-server 8.8.8.8
R1(config)#exit
R1#ping www.joelrivera.com
Translating "www.joelrivera.com"...domain server (8.8.8.8) [OK]

Translating "www.joelrivera.com"...domain server (8.8.8.8) [OK]

Translating "www.joelrivera.com"...domain server (8.8.8.8) [OK]

Type escape sequence to abort.
Sending 5, 100-byte ICMP Echos to 155.138.209.62, timeout is 2 seconds:
!!!!!
Now to the lab
| Subnet IP | Mask | Gateway |
| 192.168.113.0 | 255.255.255.0 | 192.168.113.254 |
Task 1: Configure the LAN connection.
Task 2: Define the inside and outside interfaces on R1.
Task 3: Define the access list that includes the IP addresses from the inside interface.
Task 4: Enable NAT and refer to the ACL created in the previous step and the outside interface.
Task 5: Assign an IP address to virtual PC. Ping the google’s DNS IP address.
Task 6: Assign a DNS to the PC, and ping a web URL.
