Cisco ACL lab

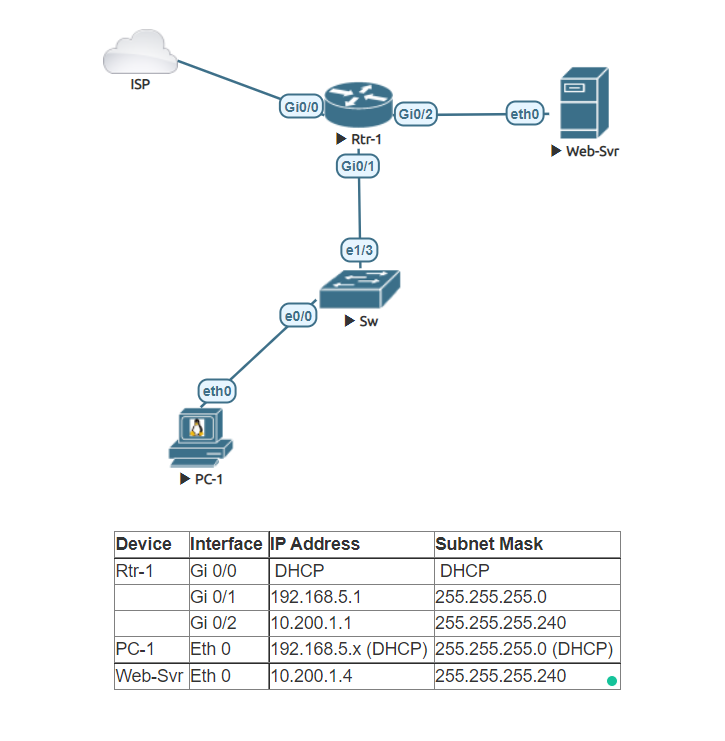
In this lab, we will run through the process of setting up a small network. We will use this network to show the different types of ACLs. We will start by using a standard named ACL in order to allow traffic to use NAT (PAT) to permit our workstation LAN network to access the internet. We will then create an extended network to permit web traffic but block others.


Change hostname Rtr-1
Access the router and change the hostname to ‘Rtr-1’. Configure the router to use Google’s DNS IP ‘8.8.8.8’.

Router>enable
Router#configure terminal
Enter configuration commands, one per line.  End with CNTL/Z.
Router(config)#hostname Rtr-1
Rtr-1(config)#ip domain-lookup
Rtr-1(config)#ip name-server 8.8.8.8

Configure Rtr-1 Interfaces
Configure each interface of Rtr-1 as they appear in the table above.

Rtr-1(config)#interface Gi0/0
Rtr-1(config-if)#ip address dhcp
Rtr-1(config-if)#no shutdown
Rtr-1(config-if)#exit
Rtr-1(config)#interface Gi0/1
Rtr-1(config-if)#ip address 192.168.5.1 255.255.255.0
Rtr-1(config-if)#no shutdown
Rtr-1(config-if)#exit
Rtr-1(config)#interface Gi0/2
Rtr-1(config-if)#ip address 10.200.1.1 255.255.255.240
Rtr-1(config-if)#no shutdown
Rtr-1(config-if)#exit
Rtr-1(config)#

Create a DHCP server on Router 1 name it Workstation-LAN
Setup a DHCP Pool named Workstation-LAN. Set the network as 192.168.5.0/24. Configure the DNS server to use Google’s DNS server IP address ‘8.8.8.8’. Set the gateway as the IP assigned to interface Gi 0/1. Reserve the first 25 IPs and the last 55 IPs.

Rtr-1(config)#ip dhcp pool Workstation-LAN
Rtr-1(dhcp-config)#network 192.168.5.0 255.255.255.0
Rtr-1(dhcp-config)#default-router 192.168.5.1
Rtr-1(dhcp-config)#dns-server 8.8.8.8
Rtr-1(dhcp-config)#exit
Rtr-1(config)#ip dhcp excluded-address 192.168.5.1 192.168.5.25
Rtr-1(config)#ip dhcp excluded-address 192.168.5.201 192.168.5.255


Set up PC-1 to a Dynamic IP address
I am using a Docker container in this lab, but you can use a Linux VM, Windows VM, or even a Virtual PC. If you are using the Docker container in EVE-NG make sure to Enable DHCP on Eth 0 is checked in the configuration window.

Set up Web-Svr as a Static IP
Configure the Web Server to use a static IP as it appears in the table above. Using a terminal configure the IP address. In this lab, I used a Docker container you can use a Linux VM, Windows VM, or a Virtual PC.

root@Web-Svr:~# ip addr add 10.200.1.4/28 dev eth0
root@Web-Svr:~# ip route add default via 10.200.1.1

Configure NAT Overload (PAT) on Rtr-1
Define the inside and outside interfaces on Rtr-1. Create a standard named ACL, using the name ‘NAT-ACL’. Permit the Workstation-LAN on the ACL. Set the ACL ‘NAT-ACL’ as the inside source and set the outside interface to overload.

Rtr-1(config)#interface Gi0/0
Rtr-1(config-if)#ip nat outside
Rtr-1(config-if)#exit
Rtr-1(config)#interface Gi0/1
Rtr-1(config-if)#ip nat inside
Rtr-1(config-if)#exit
Rtr-1(config)#ip access-list standard NAT-ACL
Rtr-1(config-std-nacl)#permit 192.168.5.0 0.0.0.255
Rtr-1(config-std-nacl)#exit
Rtr-1(config)#ip nat inside source list NAT-ACL interface Gi0/0 overload

Verify PC-1 can access internet websites
Open an RDP session to PC-1 and open a web browser and connect to any website to verify connectivity.

Start a simple web server
If you are using Docker Container in Eve-NG Pro ‘Gui-Server’ as I did you will not need to follow these instructions. If you are using a Linux VM add the following commands in the Linux terminal.

sudo apt update
sudo apt install apache2

After entering those commands you should be able to open the PC-1 web browser and access the apache webserver by typing the Web-Svr IP in the search bar of the browser like so ‘http://10.200.1.4’.

Start a Python SimpleHTTP Server on port 8080
Return back to the Web-Svr terminal and enter the following command in order to start an additional webserver on the Web-Svr.

root@Web-Svr:~# python -m SimpleHTTPServer 8080
Serving HTTP on 0.0.0.0 port 8080 ...

After entering those commands you should be able to open the PC-1 web browser and access the SimpleHTTPServer app using port 8080 and the IP address of the Web-Svr.

Create an extended ACL to block PC-1 access to port 80 but continue to permit 8080
Access Rtr-1 and configure an extended ACL using the access-list number 104. Assign the ACL to the appropriate interface. Remember the ACL created should be configured closer to the source.

Rtr-1(config)#ip access-list extended 104
Rtr-1(config-ext-nacl)#permit tcp host 192.168.5.26 host 10.200.1.4 eq 8080
Rtr-1(config-ext-nacl)#deny tcp host 192.168.5.26 host 10.200.1.4 eq 80
Rtr-1(config-ext-nacl)#exit
Rtr-1(config)#interface Gi0/1
Rtr-1(config-if)#ip access-group 104 in

Verify that PC-1 no longer has access to Port 80 of the Web-Svr

Verify the PC-1 still has access to port 8080 of the Web-Svr

Uh oh PC-1 No longer has access to the internet.

Fix the ACL so that PC-1 regains Internet Access
Change the ACL to permit all other traffic before the implicit deny.

Rtr-1(config)#ip access-list extended 104
Rtr-1(config-ext-nacl)#permit ip any any
Rtr-1(config-ext-nacl)#end

Verify that PC-1 can now access the internet after the ACL changes

You have completed the lab.
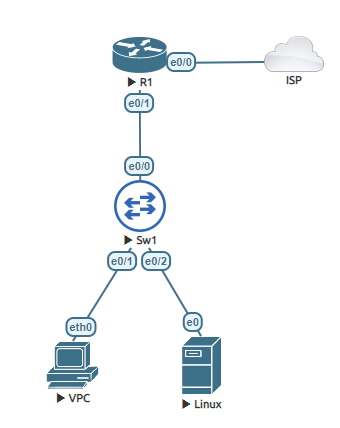
Lab: Using NAT Overload (PAT) – Using EVE-NG connect to Internet

Different than Static NAT, PAT (Port Address Translation) allows internal IPs to be translated into one IP via Port numbers. This allows a network to support many hosts while conserving public IP addresses. The router keeps a NAT table entry for every unique combination of the private IP addresses and port, with translation to the global address and a unique port number.

This lab is divided into two parts. First connecting a Cisco router to the NAT network which allows a connection to the outside (Internet). Second is using NAT overload also known as PAT to connect multiple devices from your LAN to an outside IP.

Part 1:
This is related to EVE-NG. To test the connection of the router with multiple hosts. We want to first create a connection to the internet. This will allow a more realistic lab as this is how Cisco router will usually connect to an internet connection.

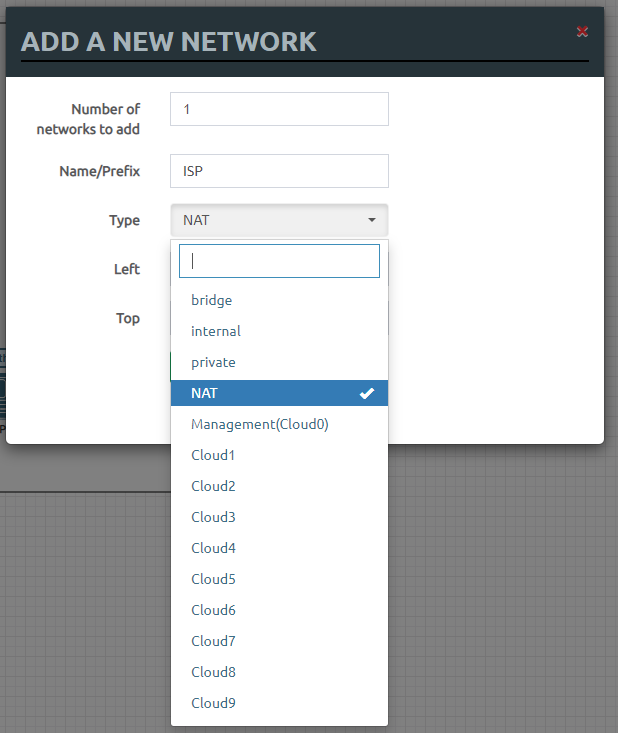
1-A: Once you are in the lab screen, Right click to add a new object and select network.

1-B: In the Drop down menu, select the NAT option and then click on the save button.

1-C: Add a new object (Node), a Cisco router. Link the router to the network connection that was previously created.

1-D: Once the router powers up enter the global configuration mode. Change the host name of the router. Then enter interface configuration mode to the corresponding port that is connected to the Network object created. Once in the interface configuration mode assign the ip address to dhcp.

Router>enable
Router# configure terminal
Router(config)#hostname R1
R1(config)#interface ethernet 0/0
R1(config-if)#ip address dhcp

1-E: After an IP address has been assigned from the DHCP server. Proceed to exit the configuration mode and ping 8.8.8.8, which is Google’s DNS server address. If the ping is successful, proceed to global configuration mode again and a DNS server IP. You can use your networks own DNS or add 8.8.8.8 by typing ‘ip name-server 8.8.8.8’. Exit the global configuration mode and ping using a URL (Uniform Resource Locator). If successful you are ready to proceed to the lab.

R1#ping 8.8.8.8
Type escape sequence to abort.
Sending 5, 100-byte ICMP Echos to 8.8.8.8, timeout is 2 seconds:
!!!!!
Success rate is 100 percent (5/5), round-trip min/avg/max = 11/13/18 ms
R1#configure terminal
Enter configuration commands, one per line.  End with CNTL/Z.
R1(config)#ip name
R1(config)#ip name-server 8.8.8.8
R1(config)#exit
R1#ping www.joelrivera.com
Translating "www.joelrivera.com"...domain server (8.8.8.8) [OK]

Translating "www.joelrivera.com"...domain server (8.8.8.8) [OK]

Translating "www.joelrivera.com"...domain server (8.8.8.8) [OK]

Type escape sequence to abort.
Sending 5, 100-byte ICMP Echos to 155.138.209.62, timeout is 2 seconds:
!!!!!

Now to the lab

Subnet IPMaskGateway
192.168.113.0255.255.255.0192.168.113.254

Task 1: Configure the LAN connection.

R1#configure terminal
Enter configuration commands, one per line.  End with CNTL/Z.
R1(config)#interface ethernet 0/1
R1(config-if)#ip address 192.168.113.254 255.255.255.0
R1(config-if)# no shutdown

Task 2: Define the inside and outside interfaces on R1.

R1(config)#interface ethernet 0/1
R1(config-if)#ip nat inside
R1(config-if)#exit
R1(config)#interface ethernet 0/0
R1(config-if)#ip nat outside
R1(config-if)#exit

Task 3: Define the access list that includes the IP addresses from the inside interface.

R1(config)#access-list 10 permit 192.168.113.0 0.0.0.255

Task 4: Enable NAT and refer to the ACL created in the previous step and the outside interface.

R1(config)#ip nat inside source list 10 interface Ethernet0/0 overload

Task 5: Assign an IP address to virtual PC. Ping the google’s DNS IP address.

VPCS> ip 192.168.113.1 /24 192.168.113.254

VPCS> ping 8.8.8.8

84 bytes from 8.8.8.8 icmp_seq=1 ttl=51 time=20.990 ms
84 bytes from 8.8.8.8 icmp_seq=2 ttl=51 time=16.394 ms
84 bytes from 8.8.8.8 icmp_seq=3 ttl=51 time=16.834 ms
84 bytes from 8.8.8.8 icmp_seq=4 ttl=51 time=13.980 ms
84 bytes from 8.8.8.8 icmp_seq=5 ttl=51 time=13.271 ms

Task 6: Assign a DNS to the PC, and ping a web URL.

VPCS> ip dns 8.8.8.8

VPCS> ping www.yahoo.com
www.yahoo.com resolved to atsv2-fp-shed.wg1.b.yahoo.com(98.138.219.231)

84 bytes from 98.138.219.231 icmp_seq=1 ttl=50 time=41.102 ms
84 bytes from 98.138.219.231 icmp_seq=2 ttl=50 time=45.928 ms
84 bytes from 98.138.219.231 icmp_seq=3 ttl=50 time=39.901 ms
84 bytes from 98.138.219.231 icmp_seq=4 ttl=50 time=41.942 ms
84 bytes from 98.138.219.231 icmp_seq=5 ttl=50 time=46.653 ms